Home | Photoalbum | Music | GameDev | RaspberryPi | Electronics
CatagoriesBurning image to SD-card Webserver Cameras and images crontab Network nc remote gnuplot kill groups Misc. |
Raspberry Pi
A small but growing collection of usefull scripts, tips and one-liners Burning image to SD-card
Show a list of drives and partitions: sudo fdisk -l
Burn image to sdc: sudo dd bs=4M if=2018-11-13-raspbian-stretch-lite.img of=/dev/sdc
Show progress (run in separat terminal): watch grep -e Dirty: -e Writeback: /proc/meminfo
Backup: sudo dd if=/dev/sdc of=/WHERE_TO_STORE_THE_BACKUP/image_name.img bs=1M
Webserver
Install and setup lighttpd webserver with PHP: sudo apt install lighttpd sudo apt install php7.3-common php7.3-cgi php7.3 sudo lighty-enable-mod fastcgi-php sudo service lighttpd force-reload sudo chown www-data:www-data /var/www sudo chmod 775 /var/www sudo usermod -a -G www-data pi
Create a php file in /var/www/html/ with the following line to test php: <?php phpinfo(); ?> Cameras and images
Take picture with camera: raspistill -w 800 -h 600 -o cam.png Livefeed from camera: raspistill -f -t 0
Install fswebcam: sudo apt install fswebcam You can take a sample shot with the following command: fswebcam -r 640x480 --jpeg 85 -D 1 web-cam-shot.jpg -r = Image resolution: --jpeg = format type of the image & 85 for its quality standard: -D = delay set before capture.:
Get image info: sudo apt install imagemagick identify image.png
Creating a timalapse-video from a folder of jpeg images ls *.jpg| awk 'BEGIN{ a=0 }{ printf "mv %s myfile%04d.JPG\n", $0, a++ }' | bash
Convert sequence of JPEG images to MP4 video: ffmpeg -r 24 -pattern_type glob -i '*.JPG' -i myfile%04d.JPG -s hd1080 -vcodec libx264 timelapse.mp4
-r 24 = output frame rate Crontab
Create a logs directory in home: mkdir logs Edit crontab (root): sudo crontab -e Choose editor and add the following line at the bottom: @reboot sh /home/pi/launcher.sh >/home/pi/logs/cronlog 2>&1
View errors: cd logs cat cronlog List for current user: crontab -l List for pi user: crontab -u pi -l Edit for current user: crontab -e Network
Mount pi system on local system: mkdir /home/sandie/Downloads/raspberry_pi/sshfs/ sshfs pi@192.168.1.42:/ /home/sandie/Downloads/raspberry_pi/sshfs/ Unmount after use: sudo umount /home/sandie/Downloads/raspberry_pi/sshfs/
Log in via ssh: ssh pi@192.168.1.76
X11 forwarding: ssh -Y pi@192.168.1.76
Search for ip in range 192.168.1.0 - 192.168.1.255: nmap -sn 192.168.1.*
show own ip: ip addr show
Setting up wifi: sudo nano /etc/wpa_supplicant/wpa_supplicant.conf
Go to the bottom of the file and add the following: network={ ssid="YOUR_SSID" psk="Your_wifi_password" }
If you want a headless way of doing it, connect the SD card to your pc (most modern distros should automount it), open a terminal window and cd to the boot drive where you can enable ssh by creating an empty file called ssh. touch ssh create a wpa_supplicant.conf file to store the wifi connection details on the Pi’s boot drive: nano wpa_supplicant.conf Paste the following content in the wpa_supplicant.conf file, adjust it with your wifi details and save it with ctrl + x.: ctrl_interface=DIR=/var/run/wpa_supplicant GROUP=netdev update_config=1 network={ ssid="NETWORK-NAME" psk="NETWORK-PASSWORD" } This will use DHCP to obtain an IP address. Unmount and disconnect the SD card from your computer and put it in the Pi. Connect a power source to the Pi and the boot sequence should begin.
Use a terminal to connect to it over ssh: ssh pi@192.168.1.123 The default password for the pi-user on a clean Raspbian install is raspberry, this should be changed as the first step.
Use nmap to see all scan for devices og the local net: nmap -sn 192.168.1.* Or use ping: ping raspberrypi.local
To make sure that the RPi can only be found on the local network, use ufw (Uncomplicated Firewall), a minimalist command line tool. This part is essential if the RPi GPIO-pins will be controlled by nc remote sudo apt-get install ufw First, deny all incoming connetions to your raspberry pi: sudo ufw default deny Second, only allow the local network connections ( In this example I suppose that your local network is 192.168.1.0/24) sudo ufw allow from 192.168.1.0/24 Finally, enable the ufw typing: sudo ufw enable You can see the active rules typing: sudo ufw status verbose nc remote
A low security and exposed for short term solutions or behind firewall:
Run on server: mkfifo /tmp/netfifo; nc -lk 1234 0</tmp/netfifo | bash -e &>/tmp/netfifo
Run on client: echo "ls" | nc HOST 1234
Set pin mode: gpio mode 25 out
GPIO 25 on/off: gpio write 25 1 / gpio write 25 0
Send to RPi examples: echo "gpio write 25 0" | nc -q 0 192.168.1.84 1234 echo "gpio write 25 1" | nc -q 0 192.168.1.84 1234
turn gpio 25 on, wait 4 sec. and turn off: echo "gpio write 25 1 && sleep 4 && gpio write 25 0" | nc -q 0 192.168.1.84 1234 gnuplot
Gnuplot is a neat little program that can plot data. sudo apt install gnuplot
Bacis data file format (temp.dat): ##date time temp_1 23/03/2019 00:00:01 50.2 23/03/2019 00:01:00 55.3 23/03/2019 00:02:00 58.4 23/03/2019 00:03:03 51.5 23/03/2019 00:04:06 52.5 23/03/2019 00:05:12 58.7 23/03/2019 00:06:14 41.8 23/03/2019 00:07:11 31.9 23/03/2019 00:08:01 28.9
Script to run gnuplot (temp.pg): #!/usr/bin/gnuplot reset set terminal png medium size 640,480 set xdata time set timefmt "%d/%m/%Y %H:%M:%S" set format x "%H:%M" set xlabel "time" set ylabel "temperature" set yrange [0:101] set title "RPI temp" set key reverse Left outside set grid set style data lines plot "temp.dat" using 1:3 lc 2 lw 2 notitle
make file executable: chmod +x temp.pg
Running the script on a data-file and output to a png: ./temp.pg > temp_graph.png This should create a nice plot like this: 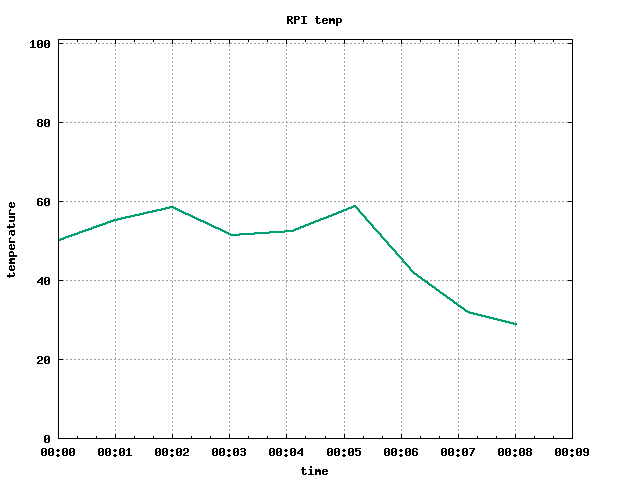 kill
Display process id: ps -e | grep "program-name" Kill process: kill - 9 'process ID' Kill process without finding PID first: kill $(ps aux | grep 'program-name' | awk '{print $2}') groups
Add user pi to the dialout group: sudo usermod -a -G dialout pi To make the changes to your groups take effect, log out and back in, or use the newgrp command: newgrp dialout Check what group user are in: groups Misc.
make file executable: chmod +x launcher.sh |
Powered by penguins